Bondtech /

What’s on your mind?
Choose below the reason why you are searching for help and we’ll try our best to help you out.
Support Themes Index
You can also explore the following resources:
Should I upgrade my 3D printer?
For filament extrusion 3D printers, the feeder/extruder is the heart that pumps plastic throughout the filament path down to the nozzle. It’s one of the most critical sub-systems in each 3D printer and the most responsible for the success or failure of print jobs.

YES to:
increase printing reliability;
improve surface quality;
enable more materials;
print faster.
.
YES if:
you have the needed technical skills;
you can make the investment.

NO if:
current reliability is acceptable;
current surface quality is enough;
current materials are enough;
current print speed is OK.
.
NO if:
you don’t have the technical skills;
you’ll struggle after making the investment.
Here is some more detailed information on our 3D printer upgrades
Bondtech designs, manufactures and sells feeders (units that feed filament to the print head) and upgrade kits (sets that improve the filament feeding and material extrusion) that users, makers and manufacturers use to improve their printers. Our products allow you to print better, faster and with unparalleled success rate. Bondtech represents reliability and performance.
Installing our hardware brings many advantages, but also comes with some costs. Deciding on adding our upgrades or not, is a personal choice that depends on personal circumstances. Think about where you stand presently, and what you want to achieve. Then ask yourself if you are willing to go through the Cons to get all the Pros.
Upgrading your 3D printer with Bondtech
Pros:
- Additional push force with lower filament tearing and deformation;
- more reliable extrusion;
- ability to print faster.
- Increased resolution up to 492 steps per mm;
- more precise extrusion;
- improves print quality.
- Smaller form factor with less moving weight;
- more flexible to install;
- reduced vibration that allow for better part quality.
- High quality parts and build;
- The printer gains in value and the filament drops in cost (less fails make it cheaper).
Cons:
- There is a premium to pay for our products;
- High quality has a cost;
- some original parts are replaced and discarded.
- It requires more know-how and technical expertise;
- to disassemble the original feeding/extrusion system;
- to install the Bondtech hardware;
- to make the necessary firmware adjustments.
- Adding or replacing hardware requires firmware adjustments.

What upgrade choices do I have?
Bondtech has many extrusion upgrade choices.
When considering to use our products you must identify what you currently use – material and extrusion type – and decide what type of upgrade you want to adopt. We have available options for the following cases:
Filament Size
1.75mm
2.85mm (or 3.00mm)
Setup Type
Direct Drive
Bowden
Upgrade Type
Drive Gears
Standalone Extruders
Upgrade Kits
About Filament sizes
When considering to upgrade your 3D printer with Bondtech technology, be aware that we have solutions to extrude filament of the following diameters:
- 1.75mm;
- 2.85mm;
- or 3.00mm thickness.
Bondtech products are not suitable to use with 3D printers that use other kinds of raw materials like thicker filament, pastes, pellets, rods, powder, or resins.
About setup types
There are two main types of extrusion systems that depend on how the extruder is mounted on your 3D printer. Bondtech provides solutions to be used with both.
Bowden systems have the extruder on a fixed position, usually attached to the chassis of the printer, and the filament is pulled from the spool and pushed through a tube (bowden tube) down to the print head, where it is extruded.
Thicker filaments are most commonly used with Bowden. Because it requires more push force, due to the friction inside the tube, it usually uses stronger motors. There are some limits regarding too abrasive materials, as they can damage the interior of the bowden tube. The weight of the extruder and stepper is not a problem, because it does not taxes the print head movement.
Direct Drive systems have the extruder attached to the hotend on a moving position
This type is most commonly used with thinner or flexible filaments. Light stepper motors are used to lower the weight load on the axial movement.
About upgrade types
Our company is specialized on providing extrusion upgrade technology. We supply multiple OEMs, that manufacture 3d printers with wide world recognized brands; many more Makers, that create and manufacture their own 3D printers; and even more consumers and companies that want to upgrade the reliability and performance of their of-the-shelf 3D printers.
Dual Drive Gears are the core component of our extrusion technology. They embrace the filament from two opposite sides and push it through the filament path. The Bondtech Dual Drive gears do this without grinding, slipping, or changing the shape of the filament.
Standalone Extruders are our standard units (eg. BMG, QR, DDG, …) that can be used in both setups, and are not brand or model dependent. They can be adapted to many printers in many different ways.
Upgrade Kits are sets of components aimed to upgrade a specific 3D printer model or 3d printer type. The upgrade kits include extruders and mounting parts, and may include additional components like hotends, cables, or others.

Any upgrades compatible with my 3D printer?
Bondtech supplies standard extruders that can be adapted to many printer models, and also dedicated extrusion upgrade kits that are designed to fit a specific model or group of similar models. In the list below you can check what choices of Bondtech Upgrade Kits we offer you to install in specific 3D printer models.
Compatibility Table
BCN3D
| > | Model | Upgrade Kit | Base | E-steps | Filament ⦰ | Type |
| BCN3D Sigma R16 BCN3D Sigma R17 |
EXT-SIGMA-3.0 | includes QR | 492.45 | 2.85mm | Bowden |
Creality
| > | Model | Upgrade Kit | Base | E-steps | Filament ⦰ | Type |
| Creality Ender 3 Creality Ender 3 Pro Creality CR-10 Creality CR-10S Creality CR-10 S4 Creality CR-10 S5 Creality CR-10S Pro Creality CR-10 V2 |
EXT-KIT-48 | includes BMG | 415 | 1.75mm | Bowden | |
| Creality Cr-10S Creality CR-10 S4 Creality CR-10 S5 |
EXT-KIT-49 | includes BMG | 415 | 1.75mm | Bowden | |
| Creality Ender 3 Creality Ender 3 Pro Creality CR-10 Creality CR-10S Creality CR-10 S4 Creality CR-10 S5 Creality CR-10S Pro Creality CR-10 V2 |
EXT-KIT-50 | includes BMG | 415 | 1.75mm | Bowden | |
| Creality CR-10S Pro | EXT-KIT-72 | includes BMG | 415 | 1.75mm | Bowden | |
| Creality CR-10 V2 | EXT-KIT-75 | includes BMG | 415 | 1.75mm | Bowden |
Flashforge
| > | Model | Upgrade Kit | Base | E-steps | Filament ⦰ | Type |
| Flashforge Creator Pro 2016 | EXT-MKB-5 | custom | 140 | 1.75mm | Direct Drive |
Prusa
| > | Model | Upgrade Kit | Base | E-steps | Filament ⦰ | Type |
| Prusa i3 MK2 Prusa i3 MK2S |
EXT-KIT-62 | BMG type | 415 | 1.75mm | Direct Drive | |
| Prusa i3 MK2.5 Prusa i3 MK3 |
EXT-KIT-63 | BMG type | 415 | 1.75mm | Direct Drive | |
| Prusa i3 MK2.5S Prusa i3 MK3S |
EXT-KIT-68 | BMG type | 415 | 1.75mm | Direct Drive | |
| Prusa i3 MK2.5S Prusa i3 MK3S |
EXT-KIT-69 | BMG type | 415 | 1.75mm | Direct Drive |
Raise3D
| > | Model | Upgrade Kit | Base | E-steps | Filament ⦰ | Type |
| Raise3D N1 Raise3D N2 Raise3D N2+ |
EXT-KIT-38 | includes DualDirect | 415 | 1.75mm | Direct Drive | |
| Raise3D N1 Raise3D N2 Raise3D N2+ |
EXT-KIT-53 | includes SingleDirect | 415 | 1.75mm | Direct Drive |
Tevo
| > | Model | Upgrade Kit | Base | E-steps | Filament ⦰ | Type |
| Tevo Tornado | EXT-KIT-48 | includes BMG | 415 | 1.75mm | Bowden | |
| Tevo Tornado | EXT-KIT-50 | includes BMG | 415 | 1.75mm | Bowden |
Ultimaker
| > | Model | Upgrade Kit | Base | E-steps | Filament ⦰ | Type |
| Ultimaker 2 Go Ultimaker 2 Ultimaker 2 Extended Ultimaker 2+ Ultimaker 2 Extended + |
EXT_UM2 | includes QR | 492.45 | 2.85mm | Bowden | |
| Ultimaker 3 Ultimaker 3 Extended |
EXT_UM3 | includes QR | 492.45 | 2.85mm | Bowden | |
| Ultimaker 2+ Ultimaker 2 Extended |
EXT-KIT-41 | includes DDG | 311 | 2.85mm | Bowden | |
| Ultimaker 3 Ultimaker 3 Extended |
EXT-KIT-43 | includes DDG | 311 | 2.85mm | Bowden |
Wanhao
| > | Model | Upgrade Kit | Base | E-steps | Filament ⦰ | Type |
| Wanhao i3 | EXT-KIT-24 | — | 140 | 1.75mm | Direct Drive | |
| Wanhao Duplicator 6 Monoprice Duplicator 6 |
EXT-KIT-39 | BMG type | 415 | 1.75mm | Direct Drive | |
| Wanhao D9 | EXT-KIT-59 | BMG type | 415 | 1.75mm | Direct Drive |
Zaribo
| > | Model | Upgrade Kit | Base | E-steps | Filament ⦰ | Type |
| Zaribo 220 MK2 Zaribo 320 MK2 |
EXT-KIT-62 | BMG type | 415 | 1.75mm | Direct Drive | |
| Zaribo 220 MK2.5 Zaribo 320 MK2.5 |
EXT-KIT-63 | BMG type | 415 | 1.75mm | Direct Drive | |
| Zaribo 220 MK2.5 Zaribo 320 MK2.5 Zaribo 220 MK3 Zaribo 320 MK3 |
EXT-KIT-68 | BMG type | 415 | 1.75mm | Direct Drive | |
| Zaribo 220 MK3S Zaribo 320 MK3S Zaribo 420 MK3S |
EXT-KIT-69 | BMG type | 415 | 1.75mm | Direct Drive |
We cannot guarantee that our Bondtech Upgrade Kits can be used on models not included in this list.

Where to ask about a Bondtech product?
To ask us for information about a Bondtech product, or other Bondtech related questions before you buy, please use the Pre-Sales Related Questions form and fill-in the requested information.
This is a form for Bondtech visitors and customers.
Please supply accurate information to ensure our support is performed in an expedite way.
Incorrect info, or not related with products or features of our website, may render the form unprocessable.
Thank you.

Can you supply me a STEP or STL file?
All our products are designed in CAD, and all plastic parts have digital versions that can be 3D printed. We do supply STEP files for OEM manufacturers and makers to design their printers and seamlessly integrate our products. We also supply some plastic components as STL, that community members can print them themselves.
Questions, instructions or issues with your order?
To ask us for information or send us instructions about an Order you placed with bondtech.se please use the Orders Related Requests form and fill-in the necessary information.
This is a form for Bondtech.se online shop customers only.
Please supply accurate information to ensure our support is performed in an expedite way.
Incorrect info, or not related with an order placed in our website, may render the form unprocessable.Not for Technical Support cases
For defective or damaged products and parts use the “Ask for Technical Support” form.
Thank you.

How do I install my Bondtech upgrade?
From standard extruders to full integrated upgrade kits, Bondtech supplies many solutions that will require a diverse range of installation engagements. Select below your model to have access to the step by step guides.
Links to PDF and Step By Step Guides
BCN3D
| > | Model | Upgrade Kit |
Stripping Down |
Bondtech Installation |
Firmware Update |
Current Adjustment |
| BCN3D Sigma | EXT-SIGMA-3.0 | Yes -> | Yes | <- Yes | No |
Creality
| > | Model | Upgrade Kit |
Stripping Down |
Bondtech Installation |
Firmware Update |
Current Adjustment |
| Creality Ender 3 Creality Ender 3 Pro Creality CR-10 Creality Cr-10S Creality CR-10 S4 Creality CR-10 S5 Creality CR-10S Pro Creality CR-10 V2 |
EXT-KIT-48 | Yes -> | Yes | Yes | Yes | |
| Creality Cr-10S Creality CR-10 S4 Creality CR-10 S5 |
EXT-KIT-49 | Yes -> | Yes | Yes | Yes | |
| Creality Ender 3 Creality Ender 3 Pro Creality CR-10 Creality Cr-10S Creality CR-10 S4 Creality CR-10 S5 Creality CR-10 V2 |
EXT-KIT-50 | Yes -> | Yes | Yes | Yes | |
| Creality CR-10S Pro | EXT-KIT-50 | Yes -> | Yes | Yes | Yes | |
| Creality Cr-10S Creality CR-10 S4 Creality CR-10 S5 |
EXT-KIT-66 gen I (EOL) | Yes | Yes | Yes | Yes | |
| Creality Cr-10S Creality CR-10 S4 Creality CR-10 S5 |
EXT-KIT-66 gen II (EOL) | Yes | Yes | Yes | Yes | |
| Creality Cr-10S Pro | EXT-KIT-72 | Yes -> | Yes | Yes | Yes | |
| Creality Cr-10 V2 | EXT-KIT-75 | Yes -> | Yes | <- Yes | Yes |
Prusa
| > | Model | Upgrade Kit |
Stripping Down |
Bondtech Installation |
Firmware Update |
Current Adjustment |
| Prusa i3 MK2 Prusa i3 MK2S |
EXT-KIT-62 | Yes -> | Yes | <- Yes | No | |
| Prusa i3 MK2.5 Prusa i3 MK3 |
EXT-KIT-63 | Yes | Yes | <- Yes | No | |
| Prusa i3 MK2.5S Prusa i3 MK3S |
EXT-KIT-68 | Yes | Yes | Yes | No | |
| Prusa i3 MK2.5S Prusa i3 MK3S |
EXT-KIT-69 | Yes | Yes | Yes | No |
Raise3D
| > | Model | Upgrade Kit |
Stripping Down |
Bondtech Installation |
Firmware Update |
Current Adjustment |
| Raise3D N1 Raise3D N2 Raise3D N2+ |
EXT-KIT-38 | Yes -> | Yes | <- Yes | <- Yes | |
| Raise3D N1 Raise3D N2 Raise3D N2+ |
EXT-KIT-53 | Yes -> | Yes | <- Yes | <- Yes |
Tevo
| > | Model | Upgrade Kit |
Stripping Down |
Bondtech Installation |
Firmware Update |
Current Adjustment |
| Tevo Tornado | EXT-KIT-48 | Yes -> | Yes | Yes | Yes | |
| Tevo Tornado | EXT-KIT-50 | Yes -> | Yes | Yes | Yes |
Ultimaker
| > | Model | Upgrade Kit |
Stripping Down |
Bondtech Installation |
Firmware Update |
Current Adjustment |
| Ultimaker 2 Go Ultimaker 2
Ultimaker 2 Extended |
EXT_UM2 | Yes -> | Yes | <- Yes | No | |
| Ultimaker 3 Ultimaker 3 Extended |
EXT_UM3 | Yes -> | Yes | Yes | No | |
| Ultimaker 2+ Ultimaker 2 Extended + |
EXT-DDG | Yes -> | Yes | <- Yes | No | |
| Ultimaker 3 Ultimaker 3 Extended |
EXT-DDG | Yes -> | Yes | Yes | No |
Wanhao
| > | Model | Upgrade Kit |
Stripping Down |
Bondtech Installation |
Firmware Update |
Current Adjustment |
| Wanhao i3 | EXT-KIT-24 | Yes -> | Yes | <- Yes | No | |
| Wanhao Duplicator 6 Monoprice Duplicator 6 |
EXT-KIT-39 | Yes -> | Yes | Yes | No | |
| Wanhao D9 / bob V1.5 Wanhao D9 / bob V1.7 |
EXT-KIT-59 | Yes -> | Yes | <- Yes | No |

How can I share stuff I made with Bondtech hardware?
Users get excited after installing a Bondtech upgrade and who could blame you guys, right? Sometimes the excitement is so much you want to share with everyone what you’ve made.
We’ll be glad to share it for you. Fill in the form below and if your piece is selected, everyone in our community will know about it. Every week we will select one project to post on our website and share it through Facebook, Instagram and Twitter. Make it amazing!

How can I recommend Bondtech?
We are glad to know you enjoy our products and our After Sales services. To recommend us go to our Facebook page and use the “Recommendations and Reviews” section to endorse our brand. We thank you a lot : )
You can also recommend Bondtech by sending us a message using our Contact Form below.

Why is my Bondtech not working properly?
A missed step during installation or a mistake in the print job preparation can cause errors to happen and prints to fail. If you are having trouble installing a Bondtech upgrade, or experiencing any kind of mal-function with it,use the following resources, available 24/7:
What Best Describes Your Problem?
The extruder's stepper motor turns in the wrong direction
There are two ways of solving this issue:
- Reconnect wires
Reverse two of the 4 wires connected to the stepper motor; - Revert direction in firmware
Use the firmware to revert the direction of rotation.
See why this happens, and how to solve it here:
Troubleshooting Extruder
The extruder's stepper motor vibrates and doesn't rotate
There are 3 main possible causes for this issue to happen:
- Broken wires
One or more wires connected to the stepper motor are broken; - Wrong wire connection
One or more wires connected to the stepper motor are using the wrong pin. - Connector not properly seated
The connector on the mainboard or on the stepper motor may be loose. It may also happen if one of the pins in a connector has moved or been pushed out.
Check the stepper motor cables and perform any corrective measure required.
The extruder's stepper motor is clicking and losing steps
There are many possible causes for this issue to happen:
- Hotend is jammed
Filament cannot pass through the hotend. Most probable cause is heat from the heat block creeped up the hotend causing the material to soften, expand and stick to heat break walls.
Use the proper working temperature and check if the cooling fans are working, and add more cooling if required.
Check if the fans or heat sinks are covered with dust and clean them if they do.
If possible use thermal paste between the heat break and the heat sink to ensure a proper dissipation of heat.
- Filament is blocked
The filament hits the edge of the PTFE tube and gets blocked. It may also happen the PTFE tube is not properly pushed against the heat break (or nozzle) and a clog forms between them.
Check the filament tube is in proper condition and has the right length.
Clear any clog or jam and re-install the PTFE tube by firmly pushing it against the heat break (or nozzle).
- Filament is stuck
The filament diameter is too large here and there, and gets stuck when is thicker than the filament path. Or, on unloading the filament tip is too thick.
Disassemble and push out the stuck filament.
Always extrude about 20 mm of filament before unloading. - Clogged nozzle
A possible explanations for this to happen is that due to wrong temperature settings for the material being used, there was not enough flow to allow the current print speed and the pressure build-up created a blockage inside the hotend.Clear the clog or replace the nozzle.
- Too much extrusion required
The hotend cannot melt all the plastic being pushed.
Reduce the print speed/layer height/extrusion width to lower the amount of plastic being pushed.
- Nozzle too close to the print bed
The nozzle is being obstructed by the print bed and plastic cannot flow.
Increase Z-offset.
Extruder is under-extruding
These are the main causes for this to happen:
-
E-steps is not properly set.
Was the firmware updated?
E-steps can be set using the recommended firmware upgrade, G-Code commands; or using machine settings. >>Check this guide -
Secondary drive gear is loose
Was the thumbscrew tightened according to recommendations?
The hinge holding the secondary drive gear may be loose, causing the filament to slip. Try tighten it using the thumbscrew. >> Check this guide - Filament is not well calibrated (less frequent)
The filament thinner than advertised or is not calibrated and its thickness varies while being extruded. This causes unexpected changes in the volume of extruded plastic.Do a calibration procedure and adjust your flow or extrusion multiplier to improve your prints.
- Wrong filament setting in slicer
The filament diameter setting in the slicer is thicker than the filament actually being used.Correct the setting to match the filament diameter.
- Partially clogged nozzle
The nozzle is semi obstructed and constrains the flow of material.Change or clean the nozzle.
Bowden tube was pushed out
There are two main possible causes for this issue to happen, both related to an interruption of the filament flow inside the hotend:
- Clogged Hotend
The hotend gets clogged and the extruder keeps pushing material causing a growing increase of back pressure that snaps the bowden out of the push-fit.; - Heat creep jam
Similar result can be also be due to a jam inside the hotend created by heat-creep.
Heat-creep is caused by heat flowing up through the heat-break. This softens the filament and disturbs the extrusion process because material is melting and flooding the interior of the heat-break instead of pushing material out of the nozzle. To avoid the heat-creep check the hotend cooling fan is working, and take the preventive measure of unloading the material after finishing printing.
In both cases, clear the clog or jam and then reattach the bowden to the push-fit so you can print again.
As our extruder can generate very high feeding force, to avoid pushing out the bowden when theissues described above occur, we recommend lowering the current of the stepper motor so that it will lose steps before the bowden tube is pushed out.
Filament is stuck inside the extruder
Due to small differences in thickness between sections of the filament path inside the hotends, and the fact that molten plastic is shaped to the extrusion channel, it can occur that filament gets stuck in thinner sections when unloading.
Disassemble and push out the stuck filament.
It is a good practice to always extrude some material (about 20 mm) before unloading the filament. This procedure will soften the blocking tip that will be able to be pushed back during unloading.
Stepper motor is too hot
If the extrusion stepper motor is getting too hot, this means the electrical current being fed to the motor is too high. Lower the current step by step until you reach a good compromise between torque and temperature.
If you are using one of our stepper motors consider the following current limits:
- Nema17 Pancake stepper 25mm : 700 mA.
- Nema17 Pancake stepper 22mm : 800 mA.
- Nema17 Geared stepper : 1200 mA.
- Nema 17 Motor Slim Power 0.9 degree : 1400 mA.
Check the User Guide of your printer on how to adjust the current. You can also search inside tab 7 Install Upgrade for guides available to your Bondtech Upgrade Kit that may have info on Current Adjustment
Filament is slipping and is not properly fed
This issue can be identified on sight or by evident signs of under extrusion. There are two main causes for the filament to slip inside the extruder:
- Loosen thumbscrew (more frequent)
The hinge assembly is not tighten and the secondary drive gear cannot make enough pressure on the filament to push it.Use the thumbscrew to properly tighten the filament as indicated here
- Missing ball bearing (less frequent)
A ball bearing may be missing on either side of the main shaft assembly. This will cause the main shaft to wobble and the primary gear will not make enough pressure on the filament to push it.
This may happen when a user opens the extruder housing and without notice the bearing may fall and get lost.You will need to buy a ball bearing replacement
My PRUSA is under-extruding or extruding slowly after upgrade
This issue may occur even if the Prusa is updated with our Bondtech firmware.
The most common cause for this to happen is by missing the last step of the guide.
- Factory Reset
When we update the firmware we change the microstepping from 32 to 16 bit. We do this because the increase of resolution of our extruder, if working at 32bit, would require the E-steps to be set at 830. It’s too many steps to be generated by the 8 bit processor in the mainboard. That change in microstepping requires a Factory Reset.Perform a Factory Reset in your Prusa (after updating the Prusa with our firmware).
Z-calibration fails in PRUSA
This issue will occur if the firmware was not updated.
- Firmware update
Because our Upgrade Kits for Prusa change the z position of the tip of the nozzle, there is a need to correct that setting.Verify here what is the version you should use on your setup, download the file and find here a guide for your printer to perform the firmware update.
My DDS is grinding the filament and the motor is getting too hot
This issue may occur if the default Retraction Settings are kept after install.
The CR-10S has a 5mm retraction distance and 45mm/s retraction speed default. This works well on a Bowden setup.
When changing to Direct Drive the same setting should be much lower and slower.
- Lower Retraction Distance and Speed
On Direct drive systems the extruder sits very close to the nozzle and it requires much less effort on retractions. Fine tune the values below to your preference.Change Retraction Distance to 1mm and Retraction Speed to 35mm/s.
Filament stops extruding during print
There are many causes for this issue to happen. Here are some of the most frequent:
- Heat Creep
Due to heat creep the material slowly melted and expanded inside the heat break up until it became a heat insulator, solidified and created a jam.Clear the jam and verify if your hotend cooling fan is working properly.
- Clogged nozzle
A possible explanations for this to happen is that due to wrong temperature settings for the material being used, there was not enough flow to allow the current print speed and the pressure build-up created a blockage inside the hotend.Clear the clog or replace the nozzle.
- Stepper motor stops
Stepper motor are very resilient and rarely stop working. The most probable cause is a shut down of data or power.Check the wires and connectors to the stepper motor.
My hotend is leaking
The most probable cause of a leaking hotend is the nozzle is not properly tighten.
- Nozzle not properly tighten
Under pressure the molten material will follow the path of less resistance. Sometimes happens that path is between the heat break and the nozzle because they are not well tighten together.Properly tighten your nozzle by following these instructions.
My POM main gear is worn out
The most probable cause of a worn main gear is the wrong assembly of the motor gear.
- Correct motor gear position
There is a proper orientation and distance to be set while attaching the motor gear to the motor shaft with the set-screw. Check the right Upgrade Kit Step By Step Guide ( see tab 7. Install Upgrade ) to learn how it’s done.Disassemble your Upgrade Kit and follow the Guide instructions to properly set the motor gear in place.
The incorrect assembly of the motor gear can also have the following adverse effects: under-extrusion; noise; feeding failure.
Homing fails on my CR-10 S4 or S5
When Homing fails the CR-10S, S4 or S5 will show the following error message:
Homing Failed; PRINTER HALTED; Please reset.
With implementation of Marlin 1.1.9, some CR-10S users experience problems when trying to home the printer. This is most likely due the new more sensitive way Marlin handles the signals. Most printer manufacturers use mechanical switches with a capacitor to filter the noise from the signal. Unfortunately Creality does not. Which means if your signal suffers from noise you might have this problem.
Mechanical solutions to solve this issue:
- If you are using an extension cable on your Z switch, remove it and check if it makes a difference.
- Separate the Z-switch cable from the bundle of other cables, they may disturb the signal.
- Twist the cables.
-
ADVANCED: Solder a 100nF capacitor in parallel with the switch. This would make the signal “noise-proof” without sacrificing accuracy, but we do not recommend this option unless you have experience with electronics and soldering. This is not guaranteed to work!
Enabling Noise filtering in Marlin could possibly solve this issue but at the cost of accuracy.
We have compiled a firmware with Noise filtering enabled. We only use 2 iterations so this should be similar to the accuracy of Creality’s stock 1.1.6 firmware.
You can download the firmware below.
- CR-10S : bondtech_fw_CR10s_1.1.9_noise_filter.hex.zip
- CR-10 S4 : bondtech_fw_CR10s4_1.1.9_noise_filter.hex.zip
- CR-10 S5 : bondtech_fw_CR10s5_1.1.9_noise_filter.hex.zip
If the mentioned solutions do not work, unfortunately you might not be able to use Marlin 1.1.9 in its current state.
We have compiled a Bondtech specific firmware based on the original firmware Creality is providing with the printers (Marlin 1.1.6)
You can find the firmware below.
- CR-10S : bondtech_fw_CR10s_1.1.6.hex.zip
- CR-10 S4 : bondtech_fw_CR10s4_1.1.6.hex.zip
- CR-10 S5 : bondtech_fw_CR10s5_1.1.6.hex.zip

How can I repair my Bondtech?
A missed step during installation or a mistake in the print job preparation can cause errors to happen, prints to fail, and sometimes damage to occur. If you had such issue that damaged your Bondtech unit, use the resources below, available 24/7, to diagnose and perform the repair.
What Best Describes Your Problem?
My extruder is blocked and PTFE tube doesn't come out
In order to disconnect the PTFE tube, the black ring of the push-fit needs to be pressed down. If it’s not possible to press it down, most likely there has been a build up of filament that blocks the black piece from being pressed.
The reason for why the filament has built up is that the PTFE tube has not been pushed all the way into the housing. If it is not pressed in all the way, there is a free space between tube and nozzle, where the filament can jam, because the extruder has a super strong grip on the material. This can also happen if you have a clogged hotend.
The easiest way to solve the issue is:
- use a scalpel to cut the tube flush to the top of the black push-fit collar;
- use the same scalpel to cut the tube from the center and outwards so you split it in two pieces;
- remove the PTFE tube from inside to allow the removal of the jammed filament that is below the coupler.
My push-fit collar broke after a jamm
When a jam occur, the Bondtech extruder keeps on pushing filament and may happen that the pressure build-up inside the hotend is enough to pop the bowden tube out of the push-fit.
The push-fit collar replacement is easy to do. You just need to buy a replacement.
- You can buy a collar replacement at our webshop, or in a Bondtech Sales Partner near you. This is a very common and affordable component that can be purchased from many other vendors as well. Choose the one closer to you to lower the shipping costs.
Here is a more detailed explanation on the causes
The Bondtech extruders multiply the torque of the stepper motors 3 fold or more, depending on the extruder. This creates a very powerful extrusion system that provides very high pressure, and that’s why it works so well : )
When the nozzle is clogged there is no place for the filament to escape, and since the extruder continues to feed, the force will be high enough to push the tube out and create space for the filament to jam up.
We recommend to use our 25 mm stepper motor that has 18 Ncm of torque that gives the extruding force needed.
When using original stepper motors with torque up to 40 Ncm and more, the extruder will be too strong, due to the 3:1 gearing ratio. In order to avoid having problems when a clog is formed, the best way is to reduce the current to the stepper motor so it will loose steps, before the force gets too high, and cause no damages
My extruder is blocked with material inside
Sometimes the extruders can get jammed when filament gets stuck inside and cannot be easily removed. Melted material can be deposited in hard to access areas of the extruder housing.
Here is how to solve this issue without damaging the extruder:
- remove the housing from your printer so you will be able to push it out from the bottom;
- if you still can’t get it out, please contact support using our “Technical Support Request” form.
My DDS heater cartridge cable broke
There are two ways of solving this issue depending on what DDS for CR-10S generation you have:
- On DDS Gen I
The heater cartridge has a long lead that goes from the cartridge to the controller box.To perform this repair, please follow this step by step guide.
- On DDS Gen II
The heater cartridge has a short lead and connector that is much easier to replace.Remove the extruder from the printer;
Take out the connector cover on the back;
Replace the heater cartridge;
Re-attach the DDS to the printer.
The ECAS push-fit can't hold the bowden tube
If you are experiencing problems with your ECAS PTFE-tube Push-fit Connector, please go through the steps listed below.
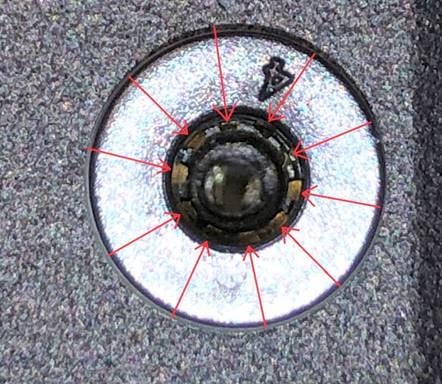
- Check Metal pins
Check that all the 10 metal pins that grab the tube are whole and look ok. See picture for clarification.
You may need to use a flashlight in a certain angle to see them correctly.
If All pins are OK, go to step 2.
If the metal pins are missing or damaged, go to step 3. - Check bowden tube
If your push-fit is fine and should work then the problem most likely comes from the tube. You need to make sure your tube is whole and not damaged. Try change the tube to a new. - Replace push-fit
If the connector is damaged and needs to be replaced follow one of the solutions presented below.
We have 3 solutions available for you to choose from:
- (Do it yourself) Replace the push-fit with a new ECAS, there is a guide further below in the webshop page on how to replace it.
- (Do it yourself) Replace it with the threaded Metal push-fit connector. You will need to drill the push-fit hole with a 8.4mm drill and thread it with a G1/8” tap, to make it fit.
- Use our Customer Service > Contact Forms > Technical Support Requests to ask for a replacement of the front housing part (part cost is $16 USD) and a threaded metal push-fit (part cost $2.63USD).
Known reasons for Push-fit Connector failure:
Too much back-pressure from the Nozzle, it can occur from:
- Heat-creep, hotend doesn’t cools enough from fan or other cooling source.
- Clogged nozzle, plastics in nozzle that caused a stop, see THIS LINK how to fix a clogged nozzle.
- Too low hotend temperature, the plastic can’t melt fast enough. Possible solution: Raise your nozzle temperature 5-15 degree Celsius.
- The nozzle is too close to the print surface and prevents plastic from coming out. Possible Solution:Level the bed properly.
- The plastic can’t be pushed through the nozzle fast enough, maximum flow is exceeded. Possible Solution: print slower or raise temperature on nozzle 5-15 degree Celsius.
To avoid damage your push-fit again, lower the stepper motor Current on your 3D printer.
The stepper motor will lose steps before the back-pressure from the hotend gets too high.

Where can I ask for technical support?
To ask us for Technical Support on a Bondtech product please use the Technical Support Request form and fill-in the necessary information.
This is a form for Bondtech users to request technical support.
Accurate information will ensure the support process is performed in an expedite way. In case of Under Warranty support requests we may ask you later for proof of purchase.
Thank you.
Couldn’t find an answer above?
Expand the section below for more questions and answers.
Additional Questions and Answers
Where can I find my Tracking Number?
When an order is ready to ship, we send the "Your Bondtech order is now complete" email with the confirmation. This note includes all detailed data regarding the order.
If the Order includes a shipping method that is traceable, a new email will be send with a tracking number, as soon as the carrier picks the related package(s) at our facilities or when we deliver them to the carrier's counter.
How long does it take to receive my order?
Normally we ship the same day or the day after if the products that you have purchased is in stock.
The stock situation can vary depending of incoming orders and lead-times can be present.
Expected FedEx shipping times is as follows.
- Europe – 1 day *
- USA – 3 days*
- Australia – 4 days*
- Rest of the world – 3-5 days*
For exact times please use FedEx Get Transit times web page since the time can vary depending on your address, use Sweden, 331 53 Värnamo as the From to address and enter your own address as To address.
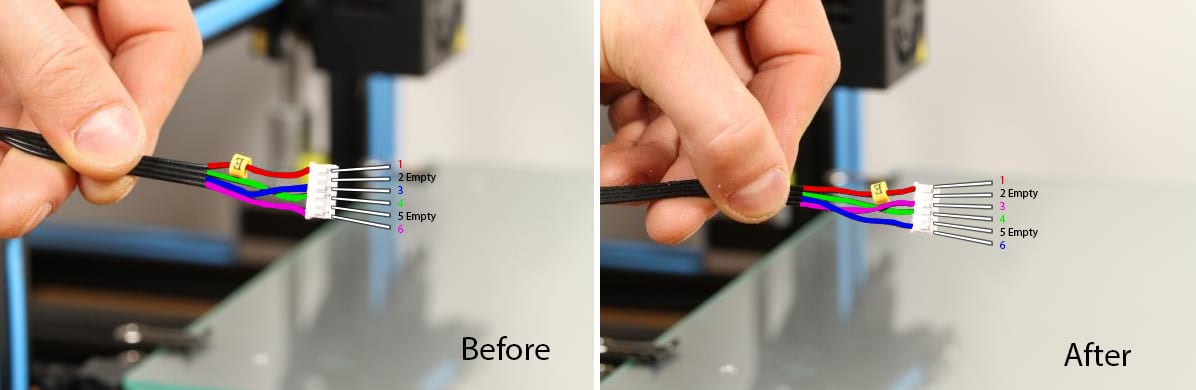
How can I reverse the direction of the stepper motor in the Prusa upgrade?
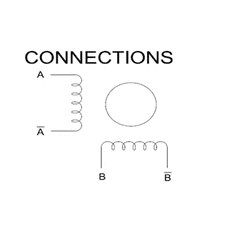
To use our Prusa Upgrade Kit there is the need to swap wires between pin 1 and 3, blue and red. This motor have the first coil between PIN1 and PIN3 and the second coil between PIN4 and PIN6
PIN2 and PIN5 are not used.
This all refers to the connector at the motor.
Missing items in my delivery, what should I do?
If something is wrong with your delivery please contact us as soon as possible and we will get it sorted out.
You can talk with us using the online chat and selecting the After-Sales department.
Click on the chat icon at the right hand bottom of the page to initiate chat. If we are offline, you can still send us a message that will be taken care as soon as we get back online.
You can also use the Order Related Form to submit to us a description of what is missing in your order.
Take me to Order Related Form
Where does my order ships from?
Currently all orders are shipped from our warehouse located in Värnamo, Sweden. We use FedEx for shipping worldwide and postal services for shipping inside Sweden.
Why do I need to reverse the direction of my stepper motor?
The high resolution and push force of our BMG and BMG based extruders is achieved with a gearing reduction of 3:1. The main gear that engages with the motor gear, does that resolution and torque upscale but, it also reverts the direction of rotation.
In many of the Bondtech upgrade kits we don't supply the wiring and stepper motors. The originals are used. Because our extruders are connected where the original extruders were, there is a need to swap wires in the connection pins.
You can find information on how to reverse the direction of the stepper motors here:
https://www.bondtech.se/customer-service/troubleshooting/#tab_extrusion
If you are using an Upgrade Kit supplied by Bondtech, that includes the stepper motor and wiring, this reversing will not be necessary.
What is the recommended retraction setting to use with DDS for CR-10S?
To use the DDS for CR-10S we recommend to use a maximum retraction length of 4 mm, but normally with regular PLA 1.1mm is sufficient. As for the retraction speed we recommend to use max 40 mm/sec, normally using 30 mm/sec is sufficient.
If some problems still persist, isolate the source by doing, one at a time, the following checks:
- test with another filament spool;
- check if the nozzle is ok
- check if the PTFE guide tube that goes into the hotend is in the right position and secure.
Do I need to update the firmware to install a Mosquito heater and thermistor?
Before doing the purchase, be sure your printer can supply enough power. The Mosquito High Temperature Thermistor will require up to 50W.
This thermistor is not linear in its relation between current and temperature, so adjustments have to be made to the firmware, namely an update of the ADC conversion lookup table.
Now, updating the firmware or not will also depend on the firmware your printer is using.
If it is a Duet3D, native support is already enabled. Choose Slice High Temperature Thermistor.
If your 3D printer is using Marlin, the Slice High Temperature Thermistor also has native support. Choose Thermistor #67 in settings.
If you are using firmware that has no native support for this thermistor, you will need to use a different Lookup Table otherwise the printer will show the wrong temperature. Click the button below to open a spreadsheet with the right RC table with ADC for the Slice HT thermistor.
Open RC table with ADC spreadsheet
How to install a Bondtech upgrade kit for Prusa MK2.5S and MK3S?
To install a Bondtech upgrade kit for the Prusa MK2.5S or MK3S you need to:
- Strip reusable parts from your Prusa
Step by step guide :
02. Prusa i3 MK2.5S - MK3S Upgrade Kit - Strip Reusable Parts/40.html
- Install the upgrade kit.
Step by step guide (standard):
03. Prusa i3 MK2.5S - MK3S Upgrade Kit - Installation/43.html
OR
Step by step guide (Mosquito):
02. Prusa i3 MK2.5S - MK3S - Mosquito Upgrade Kit - Installation/49.html
- Update the firmware.
Step by step guide :
00. Bondtech Prusa i3 - Firmware Update/44.html
How to install a Bondtech DDS upgrade kit for Creality CR-10S?
To install a Bondtech upgrade kit for the Prusa MK2.5S or MK3S you need to:
- Strip down your CR-10S
Step by step guide :
02. Stripping Down Your Creality CR-10S/8.html
- Install the DDS upgrade kit.
Step by step guide (Gen I):
02b. Direct Drive for CR-10S Gen I - Installation/51.html
OR
Step by step guide (Gen II):
02c. Direct Drive for CR-10S Gen II - Installation/52.html
- Update the firmware.
Step by step guide :
03. Direct Drive for CR-10S - Firmware Update/10.html
- If you want to add a BL Touch
Step by step guide :
04. Direct Drive for CR-10S - BL Touch/31.html
How to check Bondtech extruders compatibility?
Our extruders are open use units that may be compatible with many more 3D printer models that the ones we may advertise for. If your printer has enough clearance; if you have, or can make, a customized mount; and if you can adjust the firmware, especially the E-steps value, then you can use Bondtech extruders on many, many 3D printer models out there.
The main features that will limit compatibility of our extruders with 3D printers are:
- Thickness of the filament: 1.75 or 2.85mm;
- Type of setup: bowden or direct drive;
- Possibility of updating the firmware - E-steps and other parameters;
Compatibility Table
| Extruder | 1.75mm? | 2.85mm? | Bowden setup? | Direct Drive? | E-steps value? |
| BMG | yes | -- | yes | yes | 415 |
| BMG-M | yes | -- | -- | yes | 415 |
| BMG-X2 | yes | -- | -- | yes | 415 |
| BMG-X2-M | yes | -- | -- | yes | 415 |
| QR 1.75 | yes | -- | yes | yes but... | 476.5 |
| QR 2.85 | -- | yes | yes | yes but... | 492.45 |
| DDG | -- | yes | yes | -- | 311 |
| DualDirect (for Raise3D) | yes | -- | -- | yes | 415 |
| SingleDirect (for Raise3D) | yes | -- | -- | yes | 415 |
What Drive Gear Kits and compatible with what Extruders?
The 1.75/5.0 Drive Gear Kit can be ONLY used with the following extruders:
- Bondtech BMG (Bondtech Mini Geared) - standard and mirrored;
- Bondtech BMG-M (for Mosquito) - standard and mirrored;
- Bondtech BMG-X2 (dual extrusion) - CC 10.00 and CC 20.00 ;
- Bondtech BMG-X2-M (dual extrusion for Mosquito);
The 1.75/8.0 Drive Gear Kit can be ONLY used with the following extruders:
- Bondtech QR (Quick Release) 1.75mm - standard and mirrored;
- Bondtech V2 (Quick Release) 1.75mm ;
The 3.0/8.0 Drive Gear Kit can be ONLY used with the following extruders:
- Bondtech QR (Quick Release) 2.85mm - standard and mirrored;
- Bondtech V2 2.85mm ;
- Bondtech DDG for Ultimaker.
What Drive Gear Kits and compatible with what Upgrade Kits?
Drive gear compatibility with upgrade kits follows the compatibility with the upgrade kit's base extruder. In case the upgrade kit you are searching compatibility for, is not in the list below, identify its base extruder and check the compatibility with the extruder itself using the question above.
The 1.75/5.0 Drive Gear Kit can be ONLY used with the following upgrade kits:
- All Bondtech upgrade kits for Prusa;
- All Bondtech upgrade kits for Creality (BMG based);
- All Bondtech upgrade kits for Wanhao (BMG based and custom);
- Bondtech for Flashforge Creator Pro 2016;
- Bondtech for Makerbot Replicator 2X;
- Bondtech for Makerbot Replicator 2 Single;
- Bondtech for Raise3D SingleDirect;
- Bondtech for Raise3D DualDirect;
- Bondtech for Tevo Tornado (BMG based);
The 1.75/8.0 Drive Gear Kit can be ONLY used with the following upgrade kits:
- at the moment no upgrade kits use these gears.
The 3.0/8.0 Drive Gear Kit can be ONLY used with the following upgrade kits:
- All upgrade kits for Ultimaker (DDG and QR 2.85 based);
- All upgrade kits for BCN3D (QR 2.85 based) ;
Is the DDS compatible with Volcano and Super Volcano nozzles?
Yes, the DDS is compatible with Volcano and Super Volcano.
Our DDS is supplied with a genuine E3D V6 All-metal Hotend. The hotend comes with a 0.4mm V6 brass nozzle.
The hotend in the DDS can be upgraded to use the Volcano.
To do so, you need to be able to move the Z-height of the end stop or lower the build-plate the extra height differences from the standard E3D heat block and the volcano.
You also need to use another fan shroud for the part cooling fan that you need to 3D print.
We have the STL file available here:
10067-3V CR10 Direct Fan Shroud Volcano.STL
You will use the same heat-break and heat-sink supplied with the DDS. You will need Volcano nozzles and heat block.
The same goes for the Super Volcano, although lowering the build plate will not be enough to cover the difference in height. Remember the more you raise the Z end-stop, the less Z-height you will have available.
If you raise the Z end-stop, remember to update your machine settings and lower the Maximum Height the same amount you raised it.
What E-steps should be used for each Bondtech Extruder?
As the slicer tells how much filament should be extruded for each move the controller board uses the e-step value to determine how many steps it needs to send to the motor in order to feed the correct length of filament. Since drive-gear diameter and gearing ratio affects the number of e-steps needed it must be adjusted in order to get the correct extrusion length.
The E-step values for our extruders are:
| Extruder | E-steps value? | step angle @ micro-stepping | ||
| BMG | 415 | 1.8° @ 16bit | ||
| BMG-M | 415 | 1.8° @ 16bit | ||
| BMG-X2 | 415 | 1.8° @ 16bit | ||
| BMG-X2-M | 415 | 1.8° @ 16bit | ||
| DDX (BMG based) | 415 | 1.8° @ 16bit | ||
| IFS (BMG based) | 415 | 1.8° @ 16bit | ||
| QR 1.75 | 476.5 | 1.8° @ 16bit | ||
| QR 2.85 | 492.45 | 1.8° @ 16bit | ||
| LGX 1.75 | 400 | 1.8° @ 16bit | ||
| LGX Lite | 562 | 1.8° @ 16bit | ||
| DDG | 311 | 1.8° @ 16bit | ||
| DualDirect (for Raise3D) | 415 | 1.8° @ 16bit | ||
| SingleDirect (for Raise3D) | 415 | 1.8° @ 16bit |
To adjust the e-steps presented above to your printer, that into consideration the following:
- If the stepper motor you are using is a 0.9° per step, double the e-steps.
- If the board is set @ 32bit microstepping, double the e-steps.
How do I update the firmware?
To update the firmware of your specific system, select below by clicking the link that best fits your setup:
- I have a Bondtech Upgrade Kit installed on a Creality 3D printer;
- I have a Bondtech Upgrade Kit installed on a Prusa 3D printer;
- I have a Bondtech Upgrade Kit installed on a Ultimaker 3D printer;
- I have a Bondtech Upgrade Kit installed on a Wanhao 3D printer;
- I have a Bondtech Extruder installed on a printer not listed above.
How much should I tighten the hinge's thumbscrew?
We recommend the following regarding the thumbscrew setup:
When tightening the thumbscrew onto the metal threaded insert use at most 0.4Nm torque (don't force it too much). Using excessive torque will damage the laser sintered nylon that holds the metal insert in place.
Considering the above, tighten it all the way in and then loosen it:
- 1 to 2 full turns to use hard filament;
- 3 to 4 full turns to use soft filament (flexible).
It is recommended to perform this procedure with the filament loaded into the extruder.
Can you send me STL models?
STL files > Download 3D printable parts
| Name of part | For | STL | ||||
| Filament Guide 1.75 | Bondtech BMG and QR | Download | ||||
| Filament Guide 3.00 | Bondtech QR | Download | ||||
| Bowden Clip 1.75 | Bondtech BMG and QR | Download | ||||
| Bowden Clip 3.00 | Bondtech BMG and QR | Download | ||||
| Standard Mount | Bondtech BMG | Download | ||||
| CR-10 Mount | Bondtech BMG | Download | ||||
| CR-10S Mount Complete | Bondtech BMG | Download | ||||
| Standard Mount | Bondtech QR | Download | ||||
| BCN3D Sigma Mount | Bondtech QR | Download | ||||
| Kossel Pro Mount | Bondtech QR | Download | ||||
| Mankati Righthand Mount | Bondtech QR | Download | ||||
| Mankati Lefthand Mount | Bondtech QR | Download | ||||
| RepRap Mount | Bondtech QR | Download | ||||
| Rostock Max Mount | Bondtech QR | Download | ||||
| Rostock Max v3 Mount | Bondtech QR | Download | ||||
| Ultimaker 3 Mount | Bondtech QR | Download | ||||
| Ultimaker 2 Mount | Bondtech QR | Download | ||||
| Ultimaker Original Mount | Bondtech QR | Download | ||||
| Sensor Bracket Plastic Fitting | Bondtech DDS for Creality CR-10S | Download | ||||
| Sensor Bracket Dual Fitting | Bondtech DDS for Creality CR-10S | Download | ||||
| Fan Shroud for Volcano | Bondtech DDS for Creality CR-10S | Download | ||||
| BLtouch Bracket v1.1 | Bondtech DDS for Creality CR-10S | Download | ||||
| BLtouch bracket for Volcano | Bondtech DDS for Creality CR-10S | Download | ||||
| Cabel Clip | Bondtech DDX for Creality | Download | ||||
| DDX Universal BL Touch Mount | Bondtech DDX for Creality | Download | ||||
 |
DDX Universal BL Touch Mount For Ender-6 | Bondtech DDX v3 for Creality | Download | |||
| DDX EZABL 18mm Mount For Ender-6 | Bondtech DDX v3 for Creality | Download | ||||
| DDX BLTouch Mount CR-10S Pro/V2/Max & Mosquito | Bondtech DDX for Creality | Download | ||||
| DDX BLTouch Mount Copperhead | Bondtech DDX for Creality | Download | ||||
| DDX 18mm EZABL Mount | Bondtech DDX for Creality | Download | ||||
| DDX 12mm EZABL Mount | Bondtech DDX for Creality | Download | ||||
| Community share - AutoLev Mount | Bondtech DDX for Creality | Download | ||||
| DDX 5015 Fan Holder | Bondtech DDX for Creality | Download | ||||
| DDX 5015 Fan Shroud | Bondtech DDX for Creality | Download | ||||
| DDX V3 5015 Fan Shroud (for FDM) | Bondtech DDX v3 for Creality | Download | ||||
| Ender-5 Plus Bed Rod Holder | Bondtech DDX for Creality | Download | ||||
| PTFE/Capricorn Cutting Fixture | Bondtech DDX for Creality | Download | ||||
| CR-10S Pro Hotend Spacer for Capricorn tube | Bondtech DDX for Creality | Download | ||||
| Z-stop Adjuster For Ender-6 and Copperhead | Bondtech DDX v3 for Creality | Download | ||||
| Sensor add-on - Lever | Bondtech Upgrade Kit for Prusa i3 MK3 | Download | ||||
| Sensor add-on - Sensor Cover | Bondtech Upgrade Kit for Prusa i3 MK3 | Download | ||||
| Sensor add-on - Sensor Housing | Bondtech Upgrade Kit for Prusa i3 MK3 | Download | ||||
| X-Carriage MK3 MK3S Bear | Bondtech Upgrade Kit for Prusa i3 | Download | ||||
| X-Carriage R2 MK2.5S | Bondtech Upgrade Kit for Prusa i3 | Download | ||||
| X-Carriage R2 MK3S | Bondtech Upgrade Kit for Prusa i3 | Download | ||||
| X-Carriage R2 Rear | Bondtech Upgrade Kit for Prusa i3 | Download | ||||
| Filament Sensor - Lever | Bondtech Upgrade Kit for Prusa i3 MK3S | Download | ||||
| Filament Sensor - Filament Sensor Cover | Bondtech Upgrade Kit for Prusa i3 MK3S | Download | ||||
| Filament Sensor - Steel Ball Holder | Bondtech Upgrade Kit for Prusa i3 MK3S | Download | ||||
| Shim Rev1 | Bondtech Dual Direct Upgrade Kit for Raise3D | Download | ||||
| Shim Rev2 | Bondtech Dual Direct Upgrade Kit for Raise3D | Download | ||||
| BLtouch Holder | Bondtech Upgrade Kit for Wanhao D9 | Download | ||||
| Cooling Fan Adapter | Bondtech Upgrade Kit for Wanhao i3+ | Download | ||||
Can you send me STEP models?
STEP files > Download dummy geometries inside ZIP archives
| Bondtech Product | Variation | AddOns | STEP | |||
| LGX Extruder | Direct Drive | Copperhead screw mount | Download | |||
| LGX Extruder | For Flexibles | Right Hand side heatsink and fan | Download | |||
| LGX Extruder | For Flexibles | Left Hand side heatsink and fan | Download | |||
| Drive Gears | 1.75 / 5.00 mm | -- | Download | |||
| Drive Gears | 1.75 / 8.00 mm | -- | Download | |||
| Drive Gears | 2.85 / 8.00 mm | -- | Download | |||
| BMG Extruder | Standard (RH) | -- | Download | |||
| BMG Extruder | Mirrored (LH) | -- | Download | |||
| BMG Extruder | Standard (RH) | with ALU Mount | Download | |||
| BMG Extruder | Mosquito (BMG-M) | with Mosquito hotend | Download | |||
| BMG-X2 Dual Extruder | CC18 | -- | Download | |||
| BMG-X2 Dual Extruder | CC20 | -- | Download | |||
| BMG-X2 Dual Extruder | CC20 | with Cyclops Aqua | Download | |||
| BMG-X2 Dual Extruder | Mosquito (BMG-X2-M) | -- | Download | |||
| BMG-X2 Dual Extruder | Mosquito (BMG-X2-M) | with Hotends | Download | |||
| QR Extruder | 1.75mm Standard (RH) | -- | Download | |||
| QR Extruder | 1.75mm Mirrored (LH) | -- | Download | |||
| QR Extruder | 3.00mm Standard (RH) | -- | Download | |||
| QR Extruder | 3.00mm Mirrored (LH) | -- | Download | |||
| QR-M Extruder | 1.75mm Standard (RH) | -- | Download | |||
| QR-M Extruder | 1.75mm Mirrored (LH) | -- | Download | |||
| QR-M Extruder | 3.00mm Standard (RH) | -- | Download | |||
| QR-M Extruder | 3.00mm Mirrored (LH) | -- | Download | |||
| Sensor Housing for Upgrade Kit | Prusa i3 MK2.5 / MK3 | -- | Download | |||
| DDX Direct Drive eXtruder | no adapters included | -- | Download | |||
| DDX Direct Drive eXtruder V3 | no adapters included | -- | Download | |||
Is it about something a troubleshooting could help?
Expand the section below for troubleshooting solutions.
Troubleshooting
Extruder turning in the wrong direction


Depending on the orientation of your extruder and if you use the top or bottom port as the output port to your hotend you might need to change the rotation direction of the motor. Also using a gearing ratio will reverse the rotation direction compared to an un geared extruder.
There are two ways of doing this, either by reversing two of the 4 cables to the stepper motor or by doing a change of direction in the firmware.
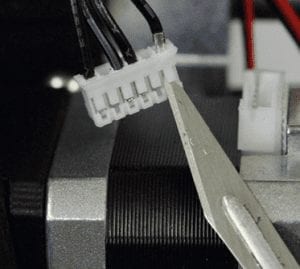
In order to reverse two cables you can use a sharp tool to lift the little plastic tab on the connector on the cable and gently pull the crimping contact out of the housing.
Remove two cables (for 1 of the coils of the stepper motor) and let them switch place with each other. Please take note of how the two coils are placed in the connector.
For Bondtech CR-10 Upgrade Kit (Based on BMG)
Use the following image sent by our friend Tom Quach as guide:
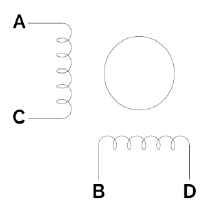
For Bondtech geared stepper motors
Coil 1 is A-C and Coil 2 is B-D, this is valid for our geared steppers, other stepper motors can have different positions and different connectors, please look at the datasheet for your motor.
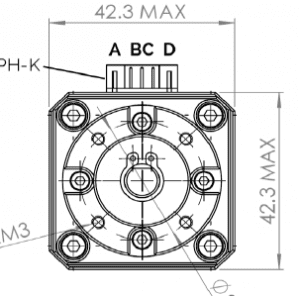
For the 25m Pancake stepper motor
Our 25 mm pancake motor uses another configuration of the connection as shown below.
On this motor the middle wires is swapped when compared to the 40 mm Geared Nema 17 motor.
Coil 1 is between PIN1 and PIN3, Coil 2 between pin 4 and 6.
Revert direction using the firmware
You can also change the setting in the firmware, the below picture shows the file Configuration.h in the Marlin Firmware for Ultimaker, to change the rotation direction edit the appropriate line from TRUE to FALSE or the other way round.
The picture below shows the configuration file for Smoothieboard. Change the direction by adding a ! after the 0.22 on the line highlighted below.
Retract distance too long
If the material gets pulled up in the heat-break during retractions there is a risk that molten material get stuck in the heat-break. Make sure that you are not using longer retracts than necessary.
Click the button below to read an interesting guide on retractions.
Click here to visit 'Musings on retractions'
Extrusion rate set too high
The volumetric extrusion rate is a combination of layer height, extrusion width and speed. If this combination of values give too a high volume / second the hotend does not have the capacity to melt the filament at the needed rate, this means that the extruder tries to push semi-molten plastic out of the nozzle orifice and this will also lead to too high extrusion force.
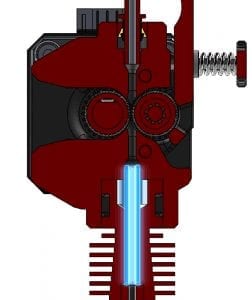
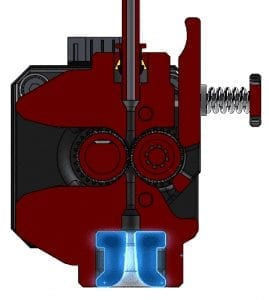
Direct Drive applications
When the QR extruder is used in a direct drive application (Hotend is placed into the extruder and the whole unit is placed on the printhead) it is important to use a piece of PTFE tube connecting the hotend with the extruder, if the PTFE is not used there is a free space in the extruder where the filament can buckle and create jams.
The length of the 4/2 mm PTFE tube on the 1.75 mm QR must be 31 mm.
For the 2.85/3.0 mm QR a PTFE tube 6/4 mm with the length of 2.5 mm must be used.
The PTFE tube is highlighted in blue color.
To learn how to setup a E3D V6 hotend on a BMG check this guide.
To learn how to setup a Mosquito hotend on a BMG check this guide.
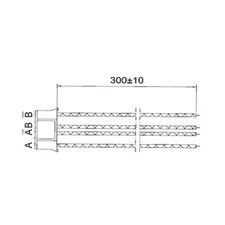
Cable connectors
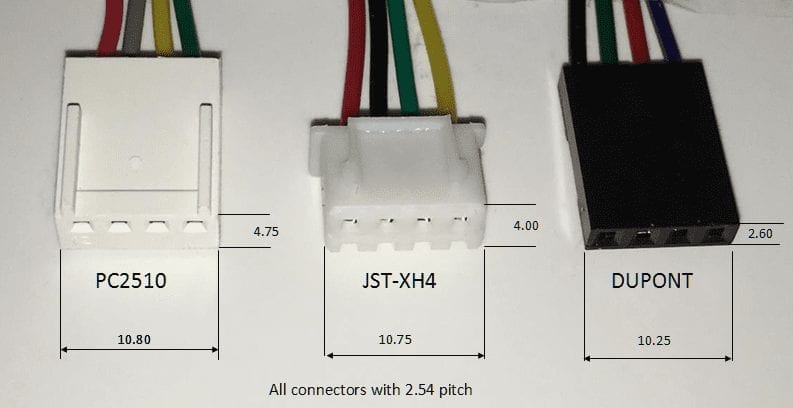
Different controller board uses different connectors for the cables to the steppermotors. We currently have 3 different options of cables. Our standard is the PC2510 connector but we also supply cables with JST-XH4 and the Dupont connector. Outside dimensions of the connectors are presented below. Further options of different types of connectors are available as customized products, please contact us if you have a need for any special connector.
Stepper motors - Supply voltage
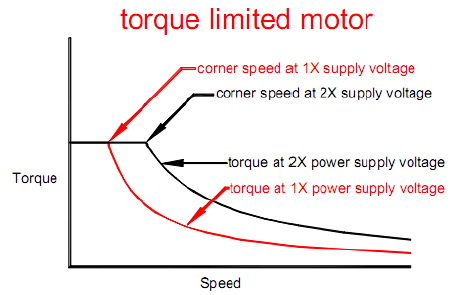
Stepper motors are normally driven in a constant current mode by the stepper driver and since the torque a motor provides is proportional to the current all the way up to the motor’s cornering speed the supply voltage controls at what speed the cornering speed happens. With higher supply voltage the motor can be run at higher speeds than with a lower voltage; this is the reason for why we recommend to use a 24V PSU on your printer. Below image is from a very nice write-up by GeckoDrives you can check by clicking this button.
Click to visit Gecko drive
Electric current settings
The geared Nema 17 motor that is used in our QR Extruders are rated for 1200 mA (1.2A), at this current the motor will reach about 50 degrees in continues printing, when using PLA that get soft at about this temperature we recommend to lower the current for the motor to keep it cooler. The following table shows the temperature of the motor in continuous mode at each current setting.
| Current setting | Motor temperature | ||
| 1200 mA | 50°C | ||
| 1100 mA | 47°C | ||
| 1000 mA | 45°C | ||
| 900 mA | 39°C | ||
| 800 mA | 37°C | ||
| 700 mA | 34°C |
As your slicing parameters, nozzle diameter, temperature and polymer type all affects your extrusion pressure you will need to use a setting that works best for you. Also one option is to attach a heat sink to the back of the motor to increase the heat dissipation to lower the temperature.
Depending of your printer and your controller different methods are used to set the correct current. Stepper drivers that have an adjustable potentiometer are adjusted measuring a Reference voltage that corresponds to the current used. Check the procedure in the following video.
Stepper drivers that are using a digipot can adjust the value by sending a G-code. If your system uses a digipot you normally adjust the current for the motor sending M907 Exxxx where xxxx is the current in Milliamps. So to set the current to 1000 mA for the extruder motor send M907 E1000.
In Ultimaker you can adjust the current for the motor from the LCD-panel directly.
You can of course insert M907 Exxx to the start section of G-codes in your slicer program.
Bowden tube gets pushed out during printing
Our bowden couplings can withstand a force of 14 kg for the 4 mm push-fit connector and 22 kg for the 6mm push-fit connector under ideal conditions. If your bowden tube keeps getting pushed out it is not a problem with the extruder, the root cause of the problem originates from another source. Below we have listed the most common probable causes. It can originate from one of them or be a combination of several problems.
Important to know if the tube have been pushed out.
Very IMPORTANT!
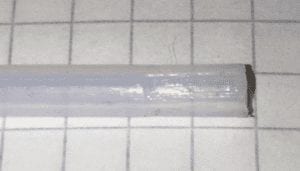
If the bowden tubes have been pushed out, you will need to cut off approximately 10 mm in order for the steel teeth of the bowden coupler to bite into a fresh PTFE surface. As the tube get damaged after repeated pushouts, failing to refresh the bite area will invariably result in more pushouts.
Bowden tube not properly inserted
If there is a movement during retractions the teeth in the coupler will eat itself into the PTFE and this will lead to a pushout sooner or later.
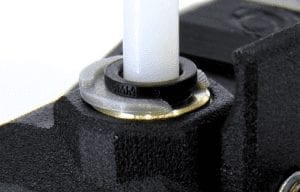
We recommend that the following procedure is performed when connecting the PTFE tube:
- Remove the bowden clip.
- Grab the black collar with your nails.
- Pull the black collar upwards when at the same time push the PTFE tube hard into the extruder, make sure the PTFE tube is all the way into the housing.
- Try to jerk the PTFE tube out and in, if there is any movement repeat step 3.
- Place the bowden clip under the black collar.
Bowden tube diameter
For our 1.75 mm extruders the PTFE tube must not be smaller than 4.0 mm, imperial size 5/32″ is 3.96 mm nominal so it is too small in order to have an optimal grip in the push-fit.
With our extruders for 2.85/3.0 mm filament we recommend to use our PTFE tube that is 6.4 mm outside diameter and 3.18 mm inside diameter (1/4″x1/8″), this will give maximum gripping force of the tube and as an added bonus it will also reduce the hysteresis effect during retractions that will make it possible to use shorter retractions distances.
Tip! If your diameter is slightly too small you can use a lighter to heat up the end of the PTFE tube until it gets clear and then let it cool off, due to the memory effect from the extrusion process the diameter will increase some tens of a millimeter and will improve the grip. Make sure to do this in a well ventilated area since the fumes from PTFE are toxic.
Bowden tube not fully inserted
If the bowden tube is not fully inserted into the housing it can move that can lead to that the bowden gets pushed out, make sure the PTFE is seated all the way into the housing.
Bowden clip is not used
If the bowden clip is not used the bowden tube will move during retractions, this can give the bowden enough momentum to break out of the bowden connector. It is also bad for your retractions since a part of the retraction distance gets eaten up of the movement of the bowden tube. If you do not have any bowden clips you can download the STL models from this page.
Bowden clip for 4mm push-fit
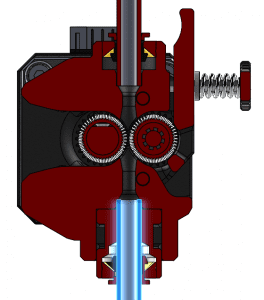
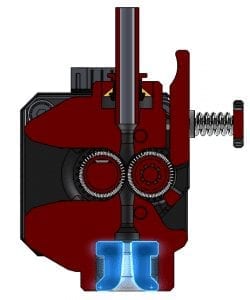
Bowden Adapters
Our bowden adapters will let you connect a bowden tube to the bottom of the extruder, this way you can use the bottom port as the output port. When using it as an output port it is important to make sure that the PTFE tube extends through the bowden adapter as it otherwise will be a free space where the filament can buckle and create jams.
The PTFE tubes are highlighted in blue color in the images below.
Heat-creep
Heat-creep is one of the most common causes for extrusion related problems.
In order to reduce the risk for this check the following:
- Make sure the cooling fan for the heat-sink is mounted in the correct orientation (blowing towards the heat-sink).
- Make sure the fan blows with full power and is not obstructed.
- Adding thermal paste to the heat-break where it screws into the heat-sink will improve thermal conductivity and can make a big difference.
- PLA is sensitive for heat-creep, do not print PLA in a sealed chamber.
- Has the surrounding temp increased? This is a common problem during hot summers.
Nozzle Temperature
Different materials uses different temperature settings, lower extrusion temperature equals higher extrusion force and if the temperature is too low you risk pushing the bowden tube out of the coupling.
Nozzle clogged due to dirt particles
If dirt particles enters the hot-end there is a risk of getting the nozzle clogged if the particle size is in the range of nozzle diameter, smaller nozzles equals higher risk since smaller particles will block the nozzle. A good solution for this is to use a filament filter (a small sponge that the filament goes through and that cleans the filament before the hot-end. Here is a good design from Creative Tools:
Nozzle too close to build surface
If the nozzle is too close to the build surface the extrusion pressure also goes up creating high extrusion forces. Bondtech Extruders can supply about twice the extrusion force when compared to other extruders but at some point it will of course reach the maximum holding force of the bowden connector.
Hot-end cooling fan
If the cooling fan for the hot-end is not cooling the cold section of the hot-end correctly it will lead to heat creep, this will make the filament soft where it shall be hard and stiff and this will lead to problems with too high extrusion force. Make sure that there is nothing that is obstructing the flow of the fan, make also sure it is running at correct speed and also make sure it blows in the correct direction towards the heat sink, not from the heat sink.
Thermistor/Thermocouple
It is essential that the thermistor has a good contact with the heating block of the hotend. If not it will not report the correct temperature. This in turn might cause an over temperature that leads to heat-creap (heat travels up to the cold section and makes the filament soft and this results in a clog of the nozzle that creates very high extrusion pressure.
Filament grinding
If one section of the filament has a bigger diameter than the normal it can happen that the filament gets jammed in the filament path inside the extruder.
Our extruder for 1.75 mm filament has a filament channel of Ø2.0 mm. The extruder for 2.85/3.0 mm filament has a filament channel of Ø3.5 mm.
If the filament is thicker than the filament channel, it will get jammed and the gears will grind it since the filament is wider than the channel.
This problem was more common in the past but because filament manufacturers have better tolerances and higher quality now, it is no longer a very common problem.
You still have unanswered questions?
Click here to access the contact forms to contact us.