-
Mosquito® Hotend - Bare Bones
-
×
 Mosquito® Hotend - Bare Bones 1 × $131.24In stock


06
Oct
Oct
A mad genius creation
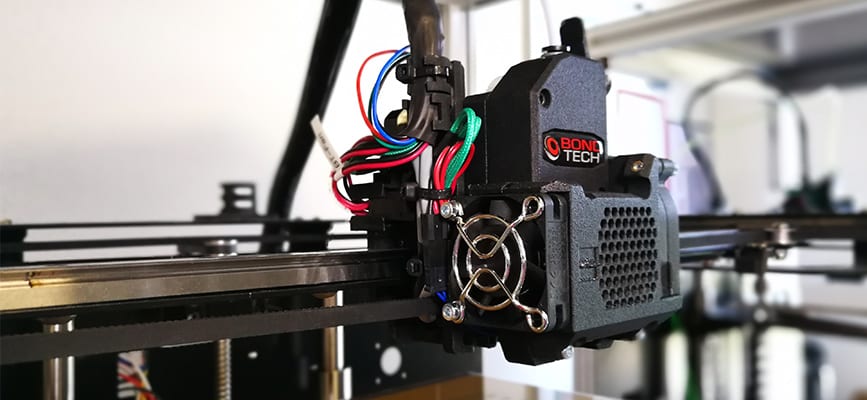
The first time we saw the CoreXYUVAB 3D printer was at the TCT Show in Birmingham, last September. It was one of the most cool, quirky, and amazing 3D printers we have ever seen. The structure was made with extruded profile aluminum. Very open, fragile somehow, but incredibly stable. Plus, it was using 5 Bondtech Mini Geared extruders. We had to know more about it, and about the mad genius behind this creation. We spoke briefly with Ian at the show but decided to engage in a longer conversation later. Here is the written interview with “Deckingman”.
Ian, could you present yourself to everyone?
I’ve always had an interesting in making things. After leaving school back in 1969 at the tender age of 16, I started a five year apprenticeship with a company called ERA which was the R&D arm of Zenith/Solex carburettors. I spent the first 2 years in the tool room where I learnt to use lathes, milling machines, centre grinders and so forth (there were no CNC machines in those days).
For the next 3 years I spent some time in all the other departments finishing my apprenticeship as an engine tester. After a brief time testing gas turbines for Rolls Royce, I joined a company who’s business was engine tuning and I became a specialist in the diagnostics and fault finding of electronic engine management systems. After that, I joined Aston Martin Tickford as a senior technician and progressed through project engineer, project manager, emission facility manager and ending up as operations manager (which I hated).
In around 1995, I left there and started my own engineering consultancy business specialising in commissioning of vehicle emission facilities and training of personnel to run those facilities. Most of this work was for large companies such as Ford Motor Co, Jaguar, Esso, Shell, Burmah Castrol, Land Rover etc. This work lasted for about 7 years but eventually, all those facilities were commissioned and the personnel had been trained and so that work came to an end.
“I became a specialist in the diagnostics and fault finding of electronic engine management systems.”
So in 2002 I had a complete change of career and started another business designing and building garden decks because I have always liked working with wood which was one of my many hobbies. I ran that business until 2018 when I reached the age of 65 and the physical effort was becoming too much so I retired. Last year I bought a small lathe and milling machine so that I could make parts for my printer from metal.
This takes my right back to when I started my apprenticeship almost 50 years ago and I was pleased to discover that I hadn’t forgotten the skills I learnt back then.
My interest in 3D printing started in about 2012 when I bought my first 3D printer which was a RepRap Pro Mendel 3. Shortly afterwards I upgraded it to a tri-colour version and shortly after that I changed the 3 nozzles for a single nozzle Diamond 3 colour. Around that time, I started to participate in various forums and had to think of a user name.
At that time, I was still running my decking business and potential customers would ring me up and say “is that the decking man”. So I chose the user name “deckingman”. Since then I have started my own blog and YouTube channel but the name “deckingman” seems to have stuck – even though I no longer design and build garden decks.
Core XYUVAB, slightly cryptic name. Why this name and what does it means?
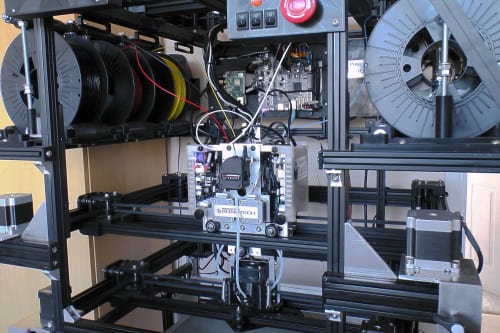
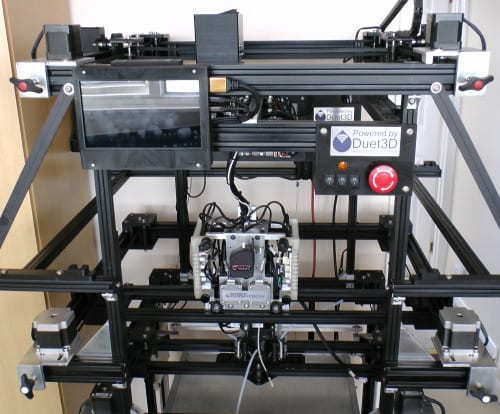
The printer is fundamentally 3 independent CoreXY gantries stacked one above the other.
The first CoreXY gantry carries a Diamond 5 colour hot end.
The second CoreXY gantry carries 6 Bondtech BMG extruders of which only 5 are currently in use.These feed filament into the Diamond hot end via short Bowden tubes but otherwise there is no mechanical connection between the two and each could move independently of the other.
The third CoreXY gantry carries nothing more than lumps of lead. This is a load balancing/force cancelling gantry. This gantry is also independent but moves in the exact opposite directions of the other two.
For “normal” printing all the motors are mapped to a single XY gantry. That is to say, the firmware considers it to be a simple CoreXY which happens to have 3 Alpha motors and 3 Beta motors. Each driver chip receives exactly the same signal but the motor directions are reversed for the upper gantry.
When the printer is turned off, with no holding current supplied to the stepper motors, it is possible that one or more gantries could be physically moved out of position in relation to the other gantries. If a print was started in this situation, then the gantry that is out of position could collide with the printer frame. For this reason, it is necessary to establish the home position of each gantry independently.
“The XY and UV gantries home to the front left hand corner, the load balancing AB gantry homes to the rear right corner.”
The initial homing is done by moving the lower two gantries together until one or other end stop switch triggers. At this point, the motors are re-mapped so that the gantries are treated as 3 independent gantries. The lower gantry is still the XY gantry but when homing it only has a single Alpha motor and a single Beta motor. The gantry carrying the extruders then becomes the UV gantry with it’s own motors and end stop switches. Finally, the load balancing becomes the AB gantry, also with it’s own motors and switches. So when homing, it is a 7 axis machine (XY, UV, AB and Z). The XY and UV gantries home to the front left hand corner, the load balancing AB gantry homes to the rear right corner. Once homing has been completed, the motors are re-mapped and the machine resorts to being a single CoreXY with 3 Alpha motors and 3 Beta motors.
Why!!?? : ) What drove you to make such a beautiful machine?
In truth, I didn’t design the machine to be the way it is now from the very start. It has evolved into what it is now and will likely continue to evolve.
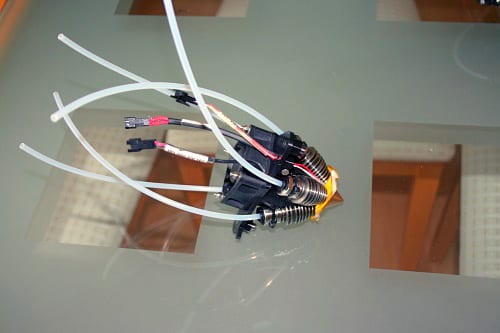
My very first printer was a Mendel, sold as a kit by RepRap Pro, a company started by Dr Adrian Bowyer who started the RepRap movement. I soon became interested in printing objects with multiple colours and purchased the tri-colour upgrade kit to convert it to a 3 colour printer. I soon became disillusioned because of the problems I had trying to get al 3 nozzles at exactly the same height, and also the problems I had with filament “oozing” from unused nozzles. Then I came across the Diamond hot end by RepRep.me which uses a single nozzle with 3 inputs. This excited me very much because it was also claimed that it could mix filaments. So for example Blue and Yellow can be mixed to produce Green. So I purchased a Diamond hot and converted the machine to use that instead of the 3 separate nozzles.
I should probably add that up until this point I had never used any sort of CAD package and I’m not designer by training. But I had written some code for things like Arduinos, just as a hobbyist. So having tried a few free CAD type packages, I settled on OpenScad as this suited me better. I am by no means an expert but I have taught myself enough to design the parts that I need.
Using a Diamond hot end or the three separate nozzles took up a lot of travel in the X direction. The Mendel only had about 200 to start with but this came down to something like 150mm. So I needed something bigger. Also, the engineer in me could see many faults with the Mendel and many areas where it could be improved.
“So I purchased a Diamond hot and converted the machine to use that instead of the 3 separate nozzles.”
So I decided to design and build my own printer which would be bigger and more rigid. From the outset I wanted to use a Diamond “mixing” hot end which, because of the way the heat sinks are fitted at an angle of about 20 degrees makes a wide hot end. I also decided that 350 to 400 mm of travel on X and Y would be good. Because the Diamond hot end is also relatively heavy, I also decided that the best way to mount it would be to have it fixed between two parallel rails. So it soon became apparent that the frame would need to be 600mm square to accommodate that range of movement. I decided to use OpenBulds V slot extrusion for the frame because any member can also be a linear guide. At that time, I didn’t have the capability to cut extrusion to the precise lengths that I would need, nor make the cut ends square. So I had to purchase the extrusion cut to length. At that time, the pricing structure was such that if one wanted say 600mm, one had to buy a 1 metre length and also pay for it to be cut. As the 400mm off cut wouldn’t be any use I decided that I might as well make the printer 1 metre tall, as it would actually have cost more to make it 600mm tall.
Having decided the overall dimensions, I then needed to decide what kinematic mechanism to use. After doing some research, I settled on CoreXYas being the most elegant with the bed only moving in the Z direction. The bed itself needed to be both flat and rigid. I also like having a removable print surface because it enables me quickly start another print without waiting for the previous one to cool. So the print bed is 400mm x 400mm aluminium tooling plate 10mm thick, topped with 6mm of float glass, fitted with an 800 Watt mains powered silicone heater, with 2 layers of insulation underneath. It is supported on 3 off 1mm pitch single start lead screws, driven by a single motor and continuous belt and prevented from moving in X or Y by two linear guides at opposite corners. It is both flat and level and needs no form of software compensation.
“Then I upgraded from a 3 colour Diamond hot end to a 5 colour … This is when it became a CoreXYUV.”
My final decision was where to mount the extruders and filament reels. I realised that if the extruders were mounted on the frame, I would need Bowden tubes that were about 1 metre long which ultimately is never going to work well. My first design was to have the extruders suspended above the hot end using a pulley and counter weight. This wasn’t too successful so I then changed itby mounting the extrudes on a second gantry. Initially this had no motors or belts and was dragged around via cords attached to the hot end. This was better but still not great. Then I upgraded from a 3 colour Diamond hot end to a 5 colour. This meant having 5 extruders which means a bigger carriage and is also even more mass to “drag” around. So that gantry had to be made wider and at the same time, I decided to make it powered by it’s own motors. This is when it became a CoreXYUV.
The final major change before upgrading to Duet generation 3, was because the printer normally stands on a wooden floor, when running at high speed the entire frame rocks due to the high moving mass and also the high centre of gravity. This is where I made a mistake in thinking that this must be having an adverse effect on print quality. What I should have done was to print something tall and at high speed to evaluate the adverse effects. But I didn’t. Instead I went ahead and added a third gantry which does the opposite of the other two gantries to cancel out the forces and stabilise the printer. This is when it became a CoreXYUVAB. To install that gantry I had to move the filament spools from the top of the machine to the sides which has made the machine wider.
I works very well and even when I am printing at 300mm/sec by utilising the 5 melt chambers concurrently, the printer is solid and does not rock any more. Unfortunately, when I finally did a test print of a tall object at high speed, without the load balancing gantry, there were no ill effects on the quality of that print. The entire printer rocks and is alarming to watch, but the print itself is fine. So in that respect, the AB gantry is a solution to a problem which does not exist. But it does stabilise the printer and having already spent the time and money to make it, there is nothing to gain by removing it. Perhaps if the frame wasn’t so rigid, then I might had seen some artefacts and perhaps by making the printer more stable, I might have reduced stresses on joints which might be beneficial in the long term.
What are the technical reasons that made you choose the Bondtech extruders?
Mixing hot ends such as the Diamond, have some unique usage requirements compared to more conventional hot ends. Firstly, filament must be loaded into all inputs at all times. Otherwise, molten filament will get pushed back up into any unused inputs, where it will cool and solidify in the heat sink and cause a blockage. By the same token, when retracting filament for non-print moves to prevent any “oozing”, all filaments have to be retracted, – not just those that are being used for that part of the print. If only one filament is retracted, then all that happens is that molten filament is pulled from the other inputs, rather than the nozzle tip.
Now one of the things I like to do is to mix filament and change the mixing ratio every layer or every 2 or 3 layers so that the colour gradually changes over the height of the object. For example, I might start with 100% blue for the first layer. Then on the next layer, change the mixing ratio so that it uses 99% blue and 1% yellow. The next layer would use 98% blue and 2% yellow etc. So after 100 layers the colour changes from blue, through green to yellow. Once I reach 100% yellow, then I might start to mix yellow with red so over the next 100 layers the colour changes from yellow through orange to red. This could then be repeated with other filament combinations so it’s quite possible that one or more filaments may not be used for the first few hundred layers of a print. And if the object is complicated, there may be many retract and un-retract cycles within each layer. So it is quite possible that a single piece of filament may undergo thousands of retract and un-retract cycles before it comes in to use.
“this repetitive action of retracting and un-retracting the same piece of filament will eventually wear the filament down so much that the extruder no longer grips it … With the Bondtech BMGs there was no problem even after 23,000 cycles.”
With “conventional” extruders which use a sprung roller pressing against the filament, this repetitive action of retracting and un-retracting the same piece of filament will eventually wear the filament down so much that the extruder no longer grips it. Or in extreme cases, it can completely grind right through the filament. So when the time comes that this filament is needed, the extruder cannot push it into the hot end and the print fails. With the Bondtech BMGs, this grinding away of the filament does not happen.
I did do a back to back tests comparing the Bondtech BMGs with the extruders that I was using at the time. Idocumented it all in my blog so I won’t name them here, but they were a well known make. Even with the spring tension set as light as possible, the other make ground completely through the filament at between 7,000 and 8,000 cycles. With the Bondtech BMGs there was no problem even after 23,000 cycles. At the time I was using 5 extruders and I changed all 5 to Bondtech BMGs.The other thing that struck me was just how easy it is to fit the BMGs compared to the other make which had many more parts. Again, I wrote a little blog post and made a YouTube video of the upgrade process.
Here is the epic “Extreme Retraction Torture Test” video from Ian Pegg
Is this project done and ready? What are you planning to do next?
No – I doubt it ever will be because I keep getting ideas of things that I’d like to try. I consider my printer to be more a test bed for ideas than a finished product. It’s fair to say that I get more enjoyment from tinkering and experimenting than I do with actually printing things.
Duet generation 3 now gives me the ability to use a Single Board Computer (SBC). I have bought and fitted a Raspberry Pi but at the moment I don’t know anything about RPis or Linux. That’s a winter project in itself. The idea behind having a SBC is that it can be used to serve the web interface, do file management and other tasks, leaving the Duet main board just to run the print. One idea I have is to fit an uninterruptible power supply (UPS). The RPi could interact with the UPS and when it detect that power has failed and it is running on battery power, the RPi could turn off the bed heater (which is mains powered in any case), and turn off lights and other non-essential items, in order to prolong the run time. Then just before the batteries are exhausted the RPi could perform an orderly shut down such that the print could be resumed once mains power is restored.
I could also fit a large HDMI screen and USB or bluetooth keyboard and mouse to the machine. Or a touch screen. Or I have an old laptop that I might somehow “hang” on the printer. There are numerous options.
I’m sure the “Duet community” will also come up with lots of other “pluggins” that might be useful.
Filament monitors might be something else I’ll add. And in the future the Duet team might come up with some different expansion boards that might suit my needs better than the current prototypes I have now.
“…so far, nobody has yet made a true mixing hot end … I have some ideas about how mixing could be achieved.”
But the main thing for me is the hot end. As you know by now, I have an interest in multi-colour printing and currently I use a Diamond hot end. But so far, nobody has yet made a true mixing hot end. The Diamond and all the other “mixing” hot ends that I am aware of simply combine filament but don’t actually mix them together, So what comes out of the nozzle is akin to stripey toothpaste. The effect can be mitigated to some degree by using transparent filament but not every object lends itself to being made transparent.
I have some ideas about how mixing could be achieved. That was the main reason why I bought a small milling machine and lathe when I retired last year. My first prototype taught me some valuable lessons but I had to abandon further work in order to get my printer upgraded and converted to Duet Generation 3. So that my goal is still to design a mixing hot end that will actually mix. Unless someone else comes up with one, in which case, I’’ll just buy it. But right now, there isn’t a hot end that will do what I want so I’ll continue to try and develop one of my own.
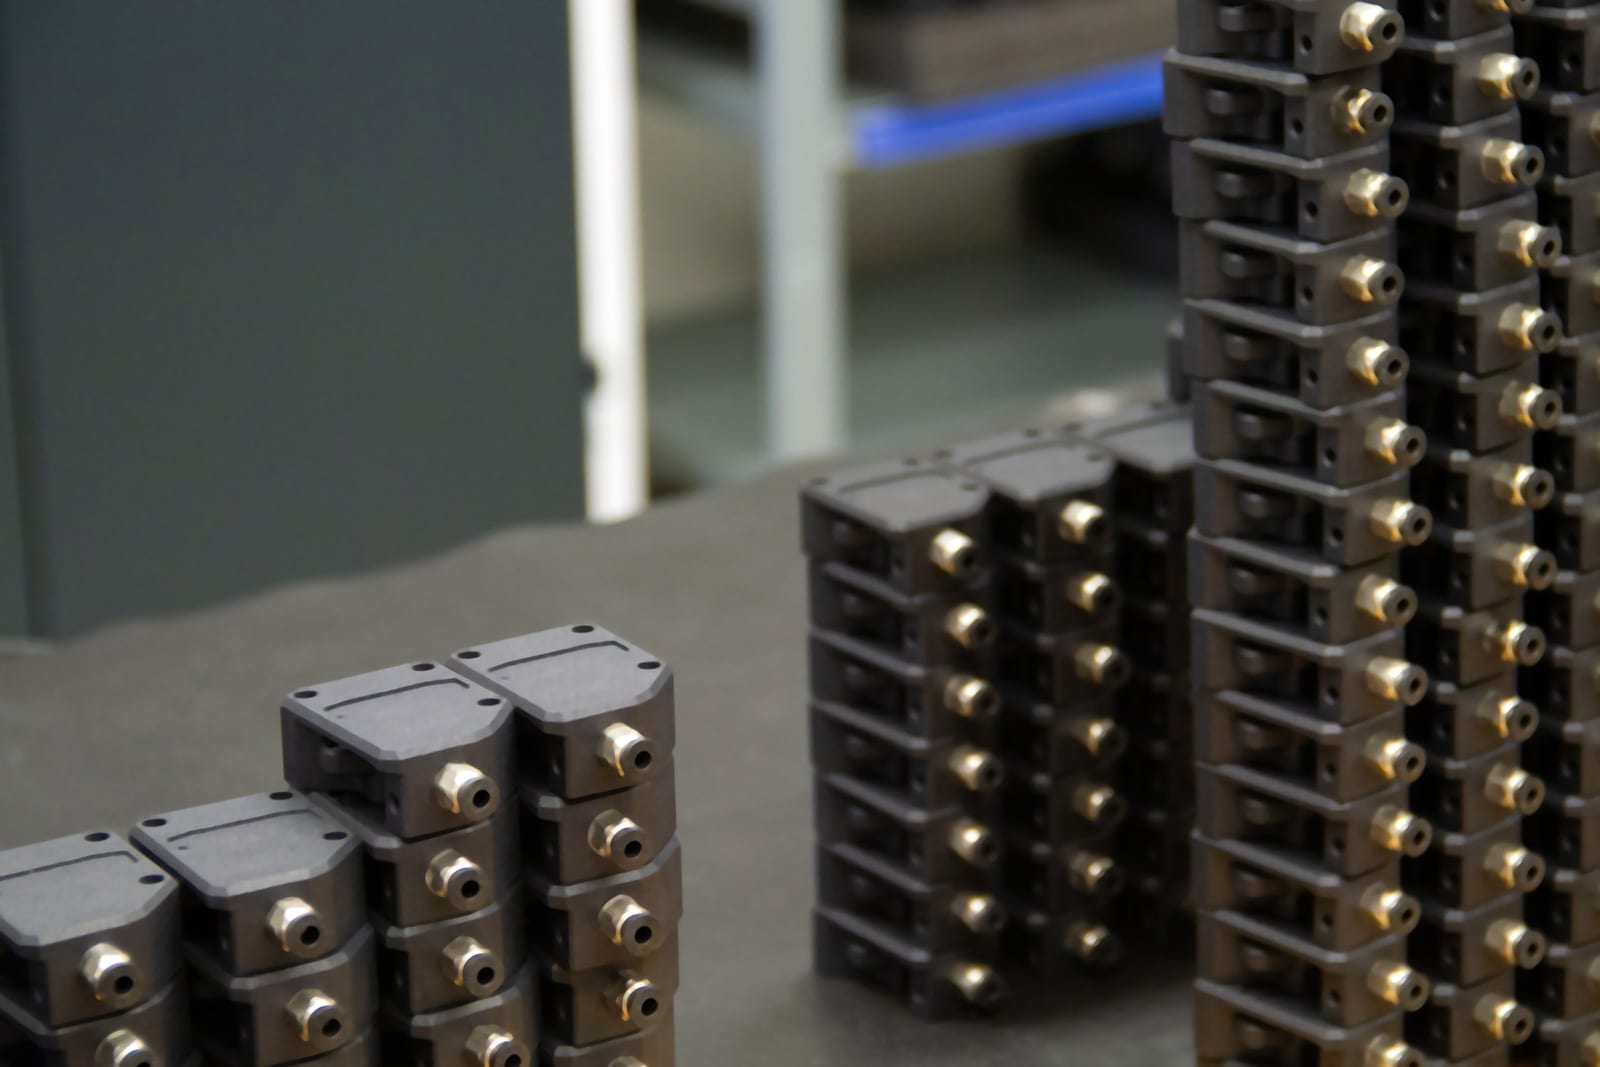
Images Gallery

Thank you Ian for all your work!
Bondtech would like to thank Ian Pegg, not only for this amazing interview but also for all the experimenting and knowledge building put on his work, from which we can all learn and get inspired.
Happy tinkering Ian! See you next time : )
Links To Ian Pegg’s Content
You can check-out his blog here:
https://somei3deas.wordpress.com/
You can check-out his Youtube Channel here: