Bondtech Firmware Updates For Creality 3D Printers
Find below Bondtech firmware to use on Creality 3D printers.
Find below Bondtech firmware to use on Creality 3D printers.
Creality3D is a chinese manufacturer that went above just low cost to reach high levels of print quality with most of their models. These barebones systems are well built and robust and can make amazingly detailed parts when properly tuned. Bondtech has available some upgrades based on our Bondtech Mini Geared (BMG) extruder, either with bowden or Direct Drive System (DDS), and we add value to many of the excellent Creality3D printers. Our hardware adds extra extrusion power and resolution to the Creality3D units, and because of that we need to spray a bit of firmware parfum on the Creality3Ds powered by Bondtech.
Updating a printer firmware may be challenging for some people, but with this article we want to make the process more accessible.
This list may be updated if there is a new firmware update from Bondtech. Older versions will stay on bottom, and the new on top.
You are either using BMG, DDS or DDX extruder kit to power your Creality.
Select on the left the according extruder kit tab.DDX PHase 1, 2 or 3 does not require firmware update.
To identify your Creality model check on the startup screen of the User Interface display. Identify the proper model to help you select the proper hardware setup;
Firmware files and processes may be different to different Creality models. Using the wrong update process can cause severe hardware damages. Select the proper accordion tab inside each extruder tab.
The BMG uses a gear reduction to create high extrusion resolution and high torque. Because of this, the E-step value needs to be increased from 96 to 415. The E-step is the value that tells the printer how many steps to send to the motor for each mm of filament. Adding a BMG increases the extrusion resolution above 4 fold.
Your CR-10 or CR-10S model may be in one of the following states:
If you try to save settings, they get lost each time you power off the printer.
If you can save settings that do not get lost each time you power off the printer.
The bootloader is software that enables to write firmware over USB.
Old Ender or CR models’ firmware cannot be flashed, so we are not supplying any firmware update for that specific model. In this case the required change of e-steps is made by gCode in the start script.
Because the change is implemented only in the start gCode the filament moves, loads and unloads done with the User Interface of the printer will require 3 times more repetitions.
In the printer profile of your slicer you will have to add the following line to the start script so it will set the new E-step value to 415:
M92 E415
This is the standard start G-code for Creality CR-10/CR-10S on your slicer:
G28 ; home all axes
G1 Z5 F3000 ; lift
G1 X5 Y10 F1500 ;move to prime
G1 Z0.2 F3000 ; get ready to prime
G92 E0 ; reset extrusion distance
G1 Y80 E10 F600 ; prime nozzle
G1 Y100 F5000 ; quick wipe
You should add the following line:
G28 ; home all axes
M92 E415; set new E-step value for Bondtech BMG Extruder
G1 Z5 F3000 ; lift
G1 X5 Y10 F1500 ;move to prime
G1 Z0.2 F3000 ; get ready to prime
G92 E0 ; reset extrusion distance
G1 Y80 E10 F600 ; prime nozzle
G1 Y100 F5000 ; quick wipe
If you can write to the EEPROM of your Creality, and/or you do not wish to make any other changes, you can use a gCode file to set and store the new E-steps setting.
In a text editor write the following two gCode commands and save the file with .gcode extension :
M92 E415; set new E-step value for Bondtech BMG Extruder
M500; store setting
After finishing editing save the file to the SD card and use the printer interface to 3D print it.
If you have installed a custom firmware in your printer you can change the e-step value directly in the firmware so there will be no need to put the command into the start script.
In the file configuration.h there is a section that contains the step values for the printer:
/**
* Default Axis Steps Per Unit (steps/mm)
* Override with M92
*X, Y, Z, E0 [, E1[, E2[, E3[, E4]]]] */#define DEFAULT_AXIS_STEPS_PER_UNIT{ 80, 80, 4000, 96}
In order to set the new steps per unit from 96 to 415 make this change:
/**
* Default Axis Steps Per Unit (steps/mm)
* Override with M92
*X, Y, Z, E0 [, E1[, E2[, E3[, E4]]]] */#define DEFAULT_AXIS_STEPS_PER_UNIT{ 80, 80, 4000, 415}
After customizing your firmware with the required change, you can just flash it into the printer.

< Click the logo to visit a page from TinyMachines3D to learn how to upgrade the firmware and download the necessary files.
To properly use the Bondtech Direct Drive on a Creality users need to update the firmware with our version. There are several reasons why we recommend our version, and the main one is the use of E3D's V6 Hot-End. This Hot-End is using a different kind of thermistor from the original one and will not show the right temperature on your display otherwise.
Another reason why we highly recommend you to change to Marlin 1.1.9 is because it enables Thermal Runaway Protection.
Bondtech has revised versions of Marlin firmware to update the Creality 3D CR-10S printer models. This firmware collection includes variations for S4 and S5 models, and also variations to support machines with or without BLtouch. See links to guides below.
< click this image to download the firmware archive for Creality CR-10S
No BLtouch.
Click this image to visit our Creality CR-10S Firmware setup guide >
and check in the guide where to download the firmware from.
< click this image to download the firmware archive for Creality CR-10S
BLtouch version 3.X
Click this image to visit our Creality CR-10S Firmware setup guide >
and check in the guide where to download the firmware from.
< click this image to download the firmware archive for Creality CR-10S
No BLtouch.
Click this image to visit our Creality CR-10S Firmware setup guide >
and check in the guide where to download the firmware from.
< click this image to download the firmware archive for Creality CR-10S
BLtouch version 3.X
Click this image to visit our Creality CR-10S Firmware setup guide >
and check in the guide where to download the firmware from.
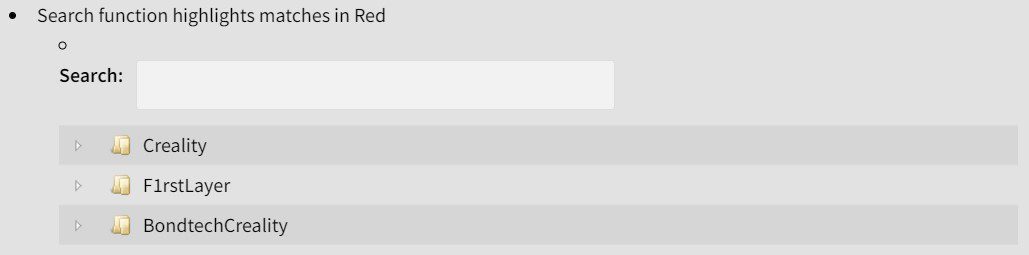
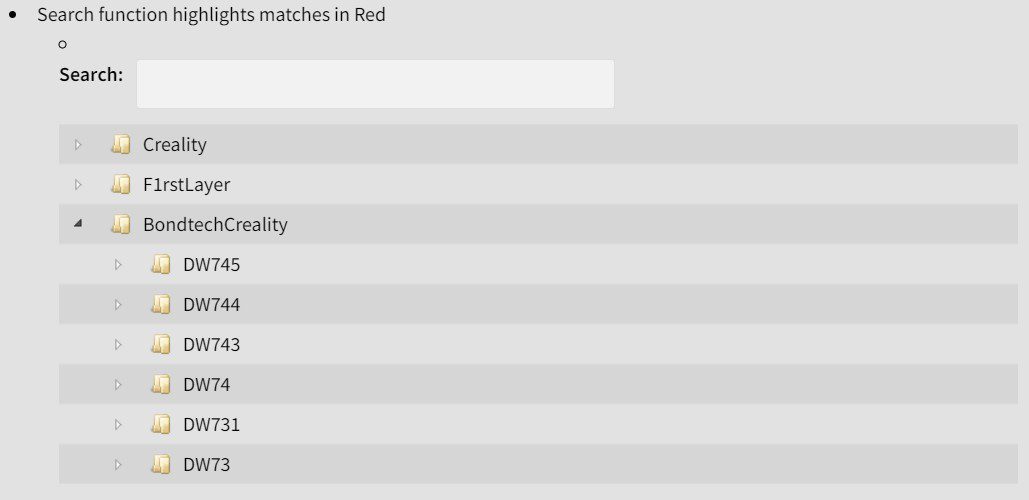
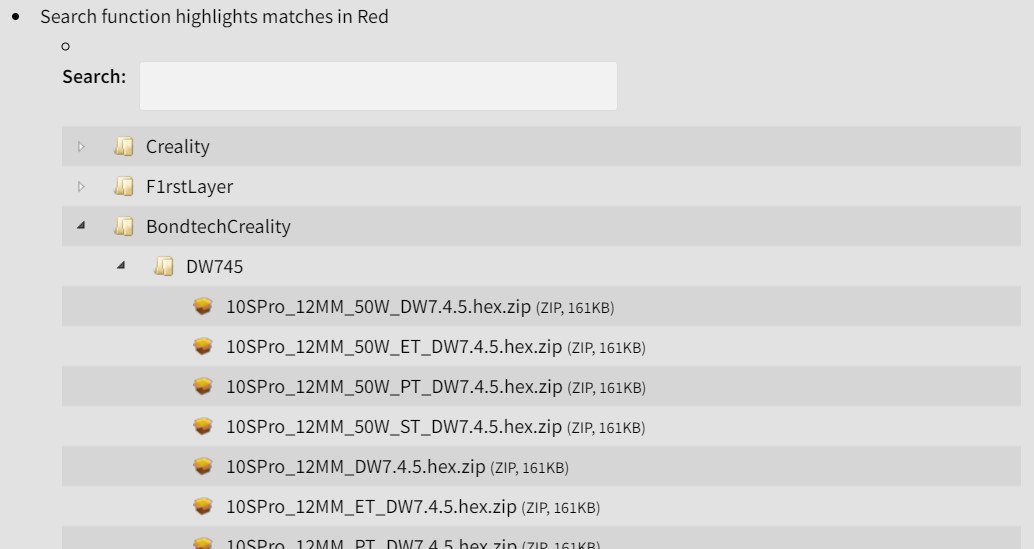
Below you will find guidance on how to locate the links to download firmware compressed archives that support using the DDX Direct Drive eXtruder on compatible Creality 3D printers, and extended firmware support to many other after-market upgrade options.
All machines with touchscreens require the installation of the touch screen DW firmware.
Do not update the firmware on your unit without updating the screen firmware as well.
Firmware for the Ender-6 is available since version 7.4.5
Preferably update the firmware only if you upgraded your thermistor and heater.
Model shortcodes with .hex firmware files:
Model shortcodes with .bin firmware files:
The absence of a shortcode in the firmware file name may only signal the feature is included in the stock versions. For instance the firmware file names related to the Creality models below, do not include the BLT shortcode, but the BL Touch is supported on the versions that do not include a bed levelling probe shortcode (eg. EZABL, 12MM).
Before upgrading the firmware to a new version, upgrade the screen firmware to the latest version first.
Check screen firmware versions below.
Check this Teaching Tech video on how to update both printer and touch screen firmware on the CR-10S Pro, before downloading and updating any firmware, in case you don't know how to do it.
Click here to download the DWIN_SET archive (version 7) with the touch screen firmware.
For all DDX compatible models except Ender-3 V2 (see below).
CR10-S / S4 / S5 and CR-10 V2/V3 don't need separate screen firmware.
Click here to download the DWIN_SET archive with the touch screen firmware for Ender-3 V2.
Click here to download the DWIN_SET archive (version 5) with the touch screen firmware.
For all DDX compatible models except Ender-3 V2 (see below).
CR10-S / S4 / S5 and CR-10 V2/V3 don't need separate screen firmware.
Click here to download the DWIN_SET archive with the touch screen firmware for Ender-3 V2.
Click here to download the DWIN_SET archive (version 4) with the touch screen firmware.
( all DDX compatible models except Ender-3 V2 )
Click here to download the DWIN_SET archive with the touch screen firmware for Ender-3 v2.
Click here to download the DWIN_SET archive (version 3) with the touch screen firmware.
( all DDX compatible models except Ender-3 V2 )
Click here to download the DWIN_SET archive with the touch screen firmware for Ender-3 v2.
Printers and screens firmware are supplied by our Partner Tiny Machines 3D in cooperation with Insanity Automation.
Find the Source Code in the Insanity Automation Github
and also the Release Notes.In case there are issues accessing the firmware files, find them under "BondtechCreality" in this page.
We remind everyone there are now 625 combinations available. Tests were performed on all the available printer models for each specific feature. Most of the combinations available were not tested together.
We ask for any Customer Support questions to be sent to us with this form.
Final Firmware Update Notes
- When printing via SD card, You may experience issues with longer file names as RAM usage is higher. We are aware of this but the current solution is to keep your file names under 8 characters. Also, do not use your SD card as a storage device. Instead, keep the files stored remotely and only add frequently printed files to the card.
- If the firmware version did not change, Initialize EEPROM manually through the Tools Menu (Settings>Tools). For example, DW7 updating to another variation of DW7 needs the EEPROM initialized. DW7 updating to DW7.1 does not as a version change will automatically clear the EEPROM.
- After updating the firmware please verify the Levelling Sensor XY Offset values set on your unit, against the recommended values in the following document :
Level Sensors OffSets for DDX
You can learn about the added User Interface screens and how to change the offset values here.
Find the DDX Step By Step Guides by clicking here.